

Key takeaways
- Usable width: Measure the narrowest point inside the cabinet. Hinges, drawer slides, and door frames can reduce the opening by 1 to 3 inches.
- Slot spacing: Allow about 2.5 inches for thin pans, 3 to 4 inches for thick skillets, and more for pans with bulky handles or pour spouts.
- Weight capacity: Standard aluminum or stainless-steel cookware may total 3 to 5 pounds per item. Cast iron can weigh 6 to 15 pounds each, so calculate the actual load instead of assuming every slot is equivalent.
- Material: Powder-coated steel resists everyday wear; stainless steel handles moisture well; plastic is light and quiet but can flex under heavy cookware.
- Base stability: Non-slip feet help on open shelves. In a cabinet, a rack with a broad base is less likely to twist when one pan is removed.
- Installation method: Freestanding racks need no tools, while pull-outs and wall rails require accurate drilling and suitable anchors.
Best Pot and Pan Organizer Racks
The best pot and pan organizer racks are the ones that match your cookware’s diameter, stack height, weight, cabinet dimensions, and preferred access method—not simply the rack with the most slots.
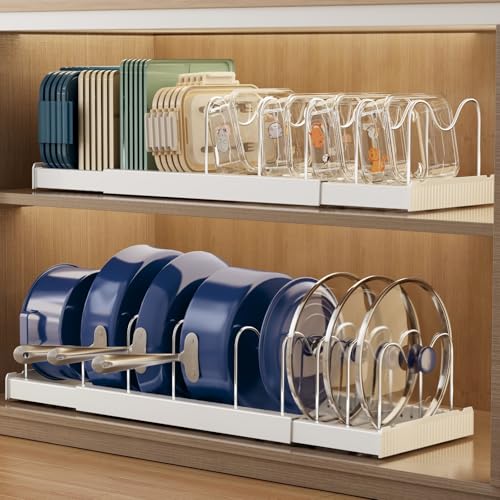
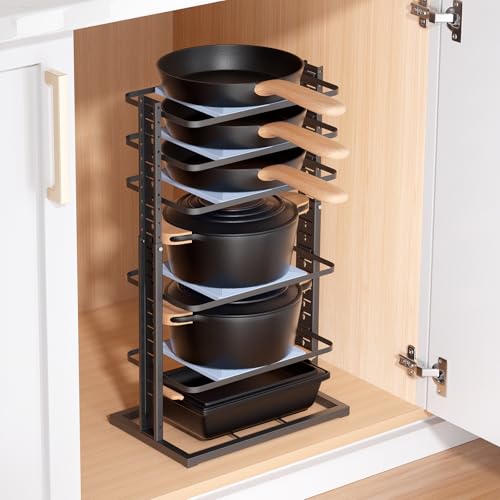
For most kitchens, an adjustable vertical rack with 5 to 9 coated-steel dividers is the best all-around choice. It keeps individual pans upright, works in a cabinet or on a shelf, and adapts when your cookware collection changes. Choose a horizontal tiered shelf for nesting saucepans and lids, a pull-out rack for deep cabinets, or a wall-mounted rail when cabinet space is limited.
Our top picks


As an Amazon Associate we earn from qualifying purchases at no extra cost to you. Ratings are shown as listed on Amazon.
Quick Picks by Kitchen Situation
| Kitchen situation | Best rack style | Useful target specifications | Why it fits |
|---|---|---|---|
| Small budget and standard cabinet | Freestanding adjustable divider rack | 12–16 inches wide, 5–7 dividers, 40–60 lb capacity | No drilling and easy to move between shelves |
| Deep cabinet with heavy cookware | Pull-out cabinet organizer | 18–24 inches deep, full-extension slides, 75–100 lb capacity | Brings rear pans forward instead of forcing you to unload the cabinet |
| Many frying pans and skillets | Vertical slot rack with wide dividers | 5–9 adjustable slots, 2.5–4 inch slot spacing | Separates handles and protects cooking surfaces from scraping |
| Mostly saucepans and stockpots | Tiered shelf or two-level stand | 8–12 inch upper clearance, 20–35 lb per level | Uses vertical space while keeping pots accessible |
| Renter or backsplash with little cabinet space | Over-door rack or tension-mounted organizer | Adjustable width, padded contact points, 20–40 lb capacity | Adds storage without permanent holes |
| Frequent cooking and quick access | Wall-mounted rail with hooks | 24–36 inch rail, securely anchored, 30–50 lb total capacity | Displays pans and avoids repeated cabinet stacking |
Which Rack Style Is Best?
Adjustable vertical divider racks
These racks hold pans on their edges, like files in a cabinet. They are usually the safest choice for frying pans, sauté pans, griddles, and lids because each item can be lifted out without moving the others. Look for dividers that slide along a track or lock into multiple positions rather than thin wires that bend under pressure.
Dividers should be tall enough to stabilize the cookware. A practical minimum is about 5 inches for ordinary frying pans and 7 to 9 inches for heavier cast-iron skillets or deep sauté pans. Rubber or silicone-coated contact points reduce slipping and help prevent scratches.
Tiered shelves and horizontal stands
A tiered stand is better for cookware that nests naturally, especially saucepans and stockpots with removable handles. It also gives you a useful second level for lids, utensils, or small baking dishes. The limitation is clearance: a tall stockpot may not fit beneath the upper shelf, and a pan with a long handle can block neighboring spaces.
Measure the cabinet opening and the internal height above the shelf, not just the exterior dimensions listed for the rack. A rack advertised as 12 inches tall may need an extra inch or two for handles and comfortable removal.
Pull-out organizers
Pull-out racks cost more and usually require installation, but they are the most convenient option for deep base cabinets. Full-extension slides let you see the back of the organizer rather than reaching into a dark cabinet. For cast iron, enameled cookware, or large stainless-steel pots, prioritize a steel frame and slides rated for at least 75 pounds.
Check whether the capacity applies to the entire organizer or to each slide assembly. A rack that holds 100 pounds when evenly distributed may not remain stable if one heavy skillet is placed at the front edge.
Wall-mounted rails and hooks
Wall rails make frequently used pans easy to grab and can free an entire cabinet. They are appropriate only when the mounting surface can support the combined weight of the rail, hooks, and cookware. On drywall, anchor the rail into studs where possible or use fasteners specifically rated for the wall construction.
Keep exposed cookware away from stovetop splatter and allow enough space between hooks to prevent handles from colliding. This style also makes dust and grease more visible, so it usually needs more frequent wiping than a cabinet rack.
Specifications That Matter More Than the Number of Slots
- Usable width: Measure the narrowest point inside the cabinet. Hinges, drawer slides, and door frames can reduce the opening by 1 to 3 inches.
- Slot spacing: Allow about 2.5 inches for thin pans, 3 to 4 inches for thick skillets, and more for pans with bulky handles or pour spouts.
- Weight capacity: Standard aluminum or stainless-steel cookware may total 3 to 5 pounds per item. Cast iron can weigh 6 to 15 pounds each, so calculate the actual load instead of assuming every slot is equivalent.
- Material: Powder-coated steel resists everyday wear; stainless steel handles moisture well; plastic is light and quiet but can flex under heavy cookware.
- Base stability: Non-slip feet help on open shelves. In a cabinet, a rack with a broad base is less likely to twist when one pan is removed.
- Installation method: Freestanding racks need no tools, while pull-outs and wall rails require accurate drilling and suitable anchors.
How to Measure for the Right Rack
Measure in this order before shopping:
- Width: Measure between the cabinet walls, then subtract at least 1 inch for clearance. For a 17-inch internal width, target a rack no wider than 16 inches.
- Depth: Measure from the cabinet front to the rear wall, excluding the door or hinge area. Leave roughly 1 inch behind a freestanding rack so it does not scrape.
- Height: Measure from the shelf to the lowest obstruction. Subtract 1 to 2 inches for easy lifting, especially when pans have long handles.
- Cookware diameter: Measure the widest point, including side handles. A 12-inch skillet may need 14 inches of practical clearance once its handles are included.
For a vertical rack, add the widths of the cookware bodies rather than counting pieces. For example, three pans measuring 2.2, 3, and 3.5 inches at their thickest points require 8.7 inches of slot width. Add about 2 inches of operating clearance, so a rack with at least 10.7 inches of usable internal width is a sensible minimum.
Best Choice by Budget, Space, and Experience
| Buyer profile | Recommended design | Typical market range | Trade-off |
|---|---|---|---|
| Low budget, no installation experience | Plastic-coated or powder-coated freestanding rack | $15–$35 | Simple setup, but less suitable for heavy cast iron |
| Moderate budget, mixed cookware | Adjustable steel divider rack | $25–$60 | Flexible and durable, though it uses horizontal cabinet width |
| Deep cabinet, frequent cooking | Full-extension pull-out rack | $70–$180 | Excellent access, but installation must be precise |
| Limited cabinets, comfortable with drilling | Anchored wall rail and hooks | $30–$100 | Fast access, but cookware remains visible and exposed |
Setup and Maintenance Mistakes to Avoid
Before loading a rack, tighten every screw and test it with a small portion of the intended weight. For a pull-out model, extend the slides slowly and confirm that the frame does not lean. Place the heaviest cookware low and near the center, not at the far front or one side.
Do not force a pan into a slot that is only slightly too narrow. Repeated rubbing can damage nonstick coatings, enamel, or seasoning. Reposition the divider or remove one slot instead. Handles should point consistently in one direction when possible; this reduces tangling and makes the weight distribution more predictable.
Wipe steel racks with a damp cloth and dry them fully. Avoid soaking unsealed metal, because moisture trapped beneath feet or in screw holes can produce rust. For grease buildup, use mild dish soap rather than abrasive scouring pads. Check rubber feet and plastic clips every few months: these are often the first parts to loosen, crack, or become slippery. Replacement feet or dividers may be available, but a rack with non-replaceable fittings can become unstable once those parts fail.
Final Buying Recommendation
Choose an adjustable vertical steel rack if your collection is mostly frying pans and you want the best balance of price, access, and flexibility. Choose a tiered stand when your cookware nests and cabinet height is generous. Choose a pull-out organizer for heavy cookware in a deep cabinet, and a properly anchored wall rail when visible, immediate access matters more than concealed storage.
Before purchasing, confirm the rack’s usable—not merely advertised—dimensions, calculate the combined weight of your cookware, and leave enough clearance to lift each piece out without scraping its neighbors. Those checks matter more than an extra slot or a decorative finish.





Write Your Review
No reviews yet. Be the first to share your experience!